
A funeral memory board offers an opportunity to remember and honor the passing of someone you held dear. It should highlight the person’s life and accomplishments through pictures and other memorabilia. Selecting the most meaningful pictures and using care when attaching them to avoid damage is important when you make the board.
Step 1
Gather your items. Think about what was most important to the deceased as far as hobbies and interests. Select any small memorabilia that you can attach to a memory board that showcases those interests. For example, maybe he won a medal in a high school sport or loved to fish. Place a medal or his favorite fish hook on the board.
Step 2
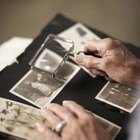
Ask family and friends for pictures. They might have known him best at certain stages and have the most pictures of that period. Scan computer files, old yearbooks and photo albums for other pictures.
Step 3
Make copies of the pictures if you’re able. This prevents originals from suffering any damage.
Step 4
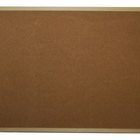
Select the background for your memory board. Options include poster board, cardboard, cork and even magnetic boards.
Step 5
Sort through the pictures you collected. Choose photos that show the person throughout his life and with family as well as ones that show his hobbies and interests.
Step 6
Choose a recent photo of the deceased and enlarge it, if necessary. Lay the board out on a flat surface and place this photo at the center of your board as the focal point. Don’t attach anything until you have the entire board laid out.
Step 7
Group the rest of the pictures and memorabilia into categories. Put all the younger pictures together, family pictures together and hobby pictures together. Arrange these in groups around the board.
Step 8
Attach the pictures and memorabilia with a temporary adhesive, such as photo corners, repositionable adhesive spray or low-tack glue, once you’re satisfied with the layout. A temporary adhesive allows you to rearrange or remove the photos without causing damage.
Step 9
Place embellishments throughout the board. Consider borders around pictures, descriptions under pictures and ribbon or other scrapbooking effects to add color.
Related Articles

How to Make a Romantic Collage for Your ...
How to Locate Someone With Just a Photo

How to Make a Photo Collage Out of ...

How to Make a 40th Birthday Poster Board
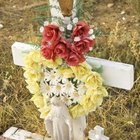
How Do I Hang a Wreath on a Tombstone?

How to Send Pictures to Inmates

How to Make a Memory Book for a Gift
How to Send Photos in the Mail

How to Memorialize on a Death ...

Band Banquet Ideas

Birthday Guest Book Ideas

Resurfacing the Top of a Snowboard

How to Make a CPO Hat Box
How to Get the Musty Smell Out of Old ...
Parent Bulletin Board Ideas for Day ...

How to Find a High School Picture Online

Ideas for a Casket Memory Box

How to Make a Tent Out of Sheets

How to Locate a Korean War Veteran

How to Make a Family Tree Using a Free ...
References
Tips
- Many funeral homes provide an easel for memory boards and some even provide the board itself.
Writer Bio
Tamara Runzel has been writing parenting, family and relationship articles since 2008. Runzel started in television news, followed by education before deciding to be a stay at home mom. She is now a mom of three and home schools her two oldest children. Runzel holds a Bachelor of Arts in communication from University of the Pacific.
Photo Credits
DreamPictures/Blend Images/Getty Images