
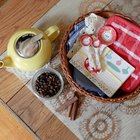
A wine-and-cheer basket does bring cheer and is a perfect gift for anniversaries, birthdays, weddings and many other special events. Baskets filled with goodies can easily be personalized and can range from simple to extravagant. Giving a little forethought to the planning will ensure that you put together a basket that is just right for the occasion.
Spend time thinking about the person or couple receiving the gift. It helps to consider the items that would make it most personal and meaningful. Find out what type of wine a couple enjoys. If they are not wine drinkers, use other beverages such as nonalcoholic sparkling ciders. Including a pair of beautiful wine glasses adds an elegant touch. Items such as a wine opener and a bottle stopper are not only fun but functional.
Give some thought to the occasion. Decide if a theme is appropriate. This will help provide a guideline for choosing food items and wine that go well together and colors and accessories that create a mood. Decide whether you are providing food for an entire meal, for instance, or a wine-and-cheese picnic.
Select a container for the gift. A wicker basket is always appropriate, but other containers may be more fun. For example, if the event is a house warming, using a large flower pot would be appropriate and practical. Make sure the basket or container has enough room to fit the selected items.
Purchase the wine, food items and small gifts to be included in the basket. Wine merchants will help you select appropriate wines to match with foods. Possible food items include cheese, olives, crackers, chocolate, caviar, dry pasta and sauce, gourmet cookies, coffee, nuts, pretzels, fruit and decadent desserts. Non-food items to consider are cloth napkins, utensils, music CDs, theater tickets, pet treats, flowers, candles, scented soaps and lotions. The choices are endless, depending on the theme.
Prepare the basket. Start with filler such as tissue paper. Then add larger items on the bottom and build upward. Tuck small items in around the larger ones. Finish by adding a beautiful ribbon and card with a hand-written note.
Related Articles

Hawaiian Gift Basket Ideas

List of Things to Put in a Gift Basket

How to Make a Honeymoon Care Package
Ideas for a Pounding Gift

Centerpiece Ideas for a Buffet Table

Favor Ideas for a 75th Birthday Party

What to Put in Hampers

Ideas for Sending a Husband a Gift at ...

Birthday Gifts for a Sister-in-Law

What Is a Bridal Shower Wishing Well?

Party Foods for a 2pm Bridal Shower
How to Buy a Gift for an Ex-Boyfriend

Ideas for Lucky Door Prizes
Raffle Gifts for a Bachelor Party

How to Make Care Packages for the ...
Pantry Shower Gift Ideas

Unique Ways to Present a Birthday Gift

Ideas for Finger Food for a Wedding ...

Things to Put in a Gift Basket for Guys

Bridal Shower Gift Wrap Ideas
References
Writer Bio
Karen Curinga has been writing published articles since 2003 and is the author of multiple books. Her articles have appeared in "UTHeath," "Catalyst" and more. Curinga is a freelance writer and certified coach/consultant who has worked with hundreds of clients. She received a Bachelor of Science in psychology.
Photo Credits
Jupiterimages/Brand X Pictures/Getty Images