Having your own hair trimmer makes it simple to keep your beard and hair line nice and neat without running to the barber shop often. While there are several different types of hair trimmers on the market, there is one universal reason for why they all stop working: dead batteries. Although it is recommended to check and change the battery every 30 days, it is very easy to forget to do this. Luckily, it is also very easy to replace the battery in a hair trimmer.
Remove the door to the casing outside the battery housing. Some doors are held in place with a screw, so unscrew it before trying to pry it open.
Remove the old battery (or batteries) and dispose of it properly. If you are using a rechargeable battery, then put it in the recharger and allow it to recharge.
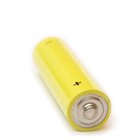
Place the new, replacement battery in the housing. Pay attention to the direction on the diagram that is printed in the housing. This will show you the correct placement of the battery, so that the positive position of the battery is facing the right way.
Replace the door back on the trimmer and check it. If nothing happens, you may have put the battery in the wrong way. Remove the door and check the position of the battery. Also, ensure the battery is pushed in all the way. Sometimes there is a click when the battery is fitted firmly in place.
Related Articles
How to Replace the Watch Battery in a ...

How do I Change the Battery in a Micro ...

How Do I Sharpen the Blades of a ...
How to Change a Titan Watch Battery
How to Change the Battery on an ...
How to Open & Clean a Norelco 1050CC ...
How to Replace the Battery in a Movado
How to Replace a Braun 7505 Battery
How to Set a Festina Watch

How to Remove a Bezel From a Dive Watch

How to Use a Conair Eyebrow Trimmer

How to Clean a Dirty Epilator
How to Adjust Andis Clipper Blades
How do I Change the Battery in a Wenger ...
How to Replace a Swiss Army Wrist Watch ...
How to Change the Battery in a Luminox ...
How to Reset a G Shock Watch

How to Change the Battery in a Kenneth ...
How to Replace the Battery In a Fossil ...

Proper Sanitizing of Electric Razors
Writer Bio
Tiesha Whatley has been writing for over 10 years. She has been published in "Marie Claire," "Ebony" and "Modern Bride" magazines. She holds a Bachelor of Science in English from the University of Alabama at Birmingham and has been working in the wedding planning industry for over 13 years.