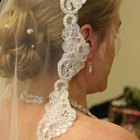
The beautiful open stitches of threadwork crochet lace are perfect for making a one-of-a-kind wedding veil. Whether you choose the extremely challenging but lovely Irish crochet lace or the simpler Irish netting, a crocheted wedding veil could become a family heirloom to be passed down through the generations. Just remember to allow plenty of time before the wedding, especially if crocheting a long veil. Although rewarding, crocheting with fine thread can be time-consuming.
Choose the style and length for the veil. The wedding veil styles that are most appropriate for crocheting include the birdcage, the center-gathered tier veil, and the standard top-gathered. The birdcage is very short with no folds or gathers at the crown, the center-gathered is a circle folded in half, and the top-gathered is a “U” shape.
Decide how you want the veil to attach to your hair. For example, you can attach your veil with a hair comb, headband, or tiara. Keep in mind that crocheted fabric is heavier than the tulle typically used for veils. A longer crocheted veil might be too heavy to be held on with just a comb.
Choose the material you want to crochet the veil from. Most likely you will need to use a fine crochet thread, size 20 or even finer, in cotton or silk.
Decide on the crochet stitch for the main veil fabric. There are a wide variety of openwork lace stitches that would make for beautiful wedding veils. Look in a stitch encyclopedia for ideas. Also consider very open and lacy doily patterns for circular veils.
Decide on any edgings and embellishments. For example, you could add a scalloped edging and crochet roses to adorn a headband.
Crochet the main veil fabric, the edging, and the embellishments.
Attach the veil to the headpiece. Consider using bridal loops or hook and loop fastener if you want to remove the veil from the headpiece after the ceremony.
Related Articles

How to Measure and Cut a Wedding Veil

How to Attach a Wedding Veil to the ...

How to Make a Chapel Veil

How to Make a Bridal Cape for a Wedding ...

How to Cut Out the Tulle for Your Veil

How to Make a Child's Veil

What Is the Difference Between Illusion ...

How to Decorate Your Knitted Scarf

How to Make a Baby Crib Canopy Out of a ...

How to Attach a Wedding Veil to a Hair ...

How to Make a Mantilla Lace Veil

How to Make a Fabric Poncho

How to Decorate Bridal Bouquets With ...

How to Make an Edge for a Bridal Veil

How to Make a Tutu Stick Out

Steps for the Straw Set Method of ...

How to Soften a Stiff Veil

How to Create Pencil Edging on a Veil
How to Make a Baby Tutu

How to Steam Wedding Veils
References
Writer Bio
Joy Prescott has over 12 years experience as a technical writer. Since 1980 she has been a professional crochet pattern designer, publishing in many crochet magazines including "Crochet!" and "Crochet World," and in books such as "Today’s Crochet: Sweaters from the Crochet Guild of America." Prescott has a Bachelor of Arts in English from Fort Lewis College in Durango, Colorado.
Photo Credits
Jupiterimages/Photos.com/Getty Images