Stockbyte/Stockbyte/Getty Images
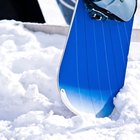
The bottom surface of a snowboard is just about the only thing that stands between a glorious ride down the mountain on your board and an inglorious ride down the slope on your behind. Snowboard bottoms are made from a durable type of low-friction polyurethane called P-Tex, which is covered with a slick wax surface. Although P-Tex is relatively strong, your board will still suffer dings and gouges over time. Refinishing your board is a fairly intense two-step process that requires patching any holes in the P-Tex and then covering the surface with a new layer of snowboard wax.
Repair Gouges
Secure your snowboard in place with a vise.
Trim away any loose material or excess wax along the edge of the gouge with a razor blade.
Clean the gouge area with rubbing alcohol or with specialized snowboard base cleaner.
Allow the base cleaner to dry completely before proceeding. This typically takes 20 to 60 minutes.
Light one side of the P-Tex repair candle with a butane lighter or propane.
Remove any black flakes of carbon that appear at the tip of the candle by allowing them to drip onto a metal scraper or other surface.
Hold your P-Tex candle to the surface of the board so that the molten P-Tex fills in the gouged area. Fill the gouge so that it overflows slightly, as the P-Tex will shrink as it cools off.
Wait 15 minutes for the P-Tex to cool.
Scrape away any excess P-Tex with a sharpened metal scraper.
Sand the surface with medium grade sandpaper. Once the base of the board is relatively flat, you're ready to apply a coat of wax to the board.
Wax the Board
Place your snowboard face-down on a tarp, sheet or other surface that you don't mind spilling excess wax on.
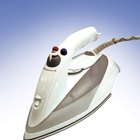
Hold a bar of snowboard wax against a hot iron set to medium heat.
Drip the melting wax onto the surface of the snowboard. Apply a thin layer of wax evenly across the bottom of the board.
Scrape any excess wax away using a plastic scraper.
Polish the bottom of the board with a scouring pad until the surface is even and smooth.
Related Articles
Resurfacing the Top of a Snowboard
How to Repair and Remove the Steel Toe ...

How to Repair a Fiberglass Swimming Pool
How to Get Paint Off of Your Uggs

How to Get Nail Stickers to Stick Well
How to Remove Foam From Vinyl Window ...
How to Apply Nail Polish Without Streaks

How to Waterproof a Leather Jacket
How to Use Laminate Pouches With an Iron

How to Repair a Leather Belt

How to Fix a Nike Cortez If the Sole Is ...
How to Rejuvenate a Non-Stick Pan
How to Remove the Tassels From Loafers

How to Unclump Eyelashes

How to Wax Arm Hair
How to Use Shoe Polish
How to Patch a Waterproof Rain Jacket

Denatured Alcohol Uses
How to Care for Skin Abrasions

How to Glue a Leather Shoe Strap
Writer Bio
Dan Howard is a sports and fitness aficionado who holds a master's degree in psychology. Howard's postgraduate research on the brain and learning has appeared in several academic books and peer-reviewed psychology journals.
Photo Credits
Stockbyte/Stockbyte/Getty Images