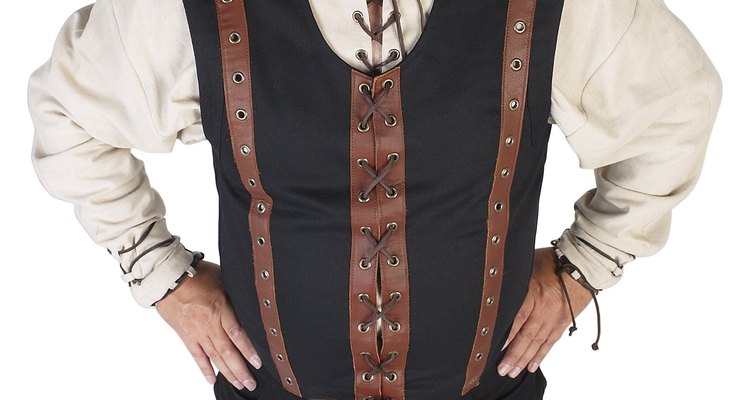
Soldiers, peasants, bailiffs, hunters and outdoorsmen alike wore jerkins in medieval times. Jerkins were a vest-like, sleeveless garment, often made of boiled leather, worn over doublets, tunics or shirts for warmth and protection. While nobles wore their jerkins with tight-fitting waists, which were often slashed and highly decorated, most men of the period wore jerkins of a looser construction, fastened or laced in the front, and longer, over the hips. Soldiers' jerkins could be lined with wool for added warmth and padding.
Measure yourself from the neck and shoulder to the top of the thigh. That’s the length of your jerkin, more or less. Also measure the distance from neck and shoulder to your navel. That’s your waistline measurement, which you’ll need later.
Double the measurement of shoulder to top of thigh. This number will tell you the amount of fabric you’ll need for the jerkin. A workingman’s or soldier’s jerkin fell to the tips of his fingers. A nobleman’s jerkin would nip in at the waist, and extend a bit further in a flared out hem, somewhat like a small skirt to the garment.
Take a basic shirt pattern with a square hem and tape the yoke pattern to the back pattern, so it makes one piece. The back pattern may be wider than the yoke. This is so the back of a shirt would have room for a box pleat, allowing extra room for forward movement for the wearer. This isn’t necessary for the jerkin, so fold the back pattern until it matches the yoke.
Pin the front pattern to the material, and then cut out the piece, allowing an extra 5/8 inch beyond the pattern mark for the seam allowance. Pin and cut out the other front pattern, allowing the extra 5/8 inch. This 5/8 inch over the pattern is the rule for all the pattern pieces. Use the waistline measurement to mark where the waist would be on the garment pieces. Mark the waistline with a pin.
Pin and cut out the back pattern. Mark where the waist would be and put a pin there.
Sew the front pieces to the back pieces at the shoulder seams.
Pin the side seams together. Note that the sleeve opening on the back pattern is deeper than on the front pieces. Use the waistline pins to match the front and back pieces. Sew the side seams.
Finish the jerkin by hemming the sleeve holes, hemming neck to hem on each front piece and hemming the overall garment. Make small buttonholes from the neck about halfway down the front on each side. Use these holes to lace up the top half of the jerkin. Leather laces will look best on this soldier’s jerkin.
Related Articles

How to Narrow Wide Pants
How to Sew a Medieval Cowl

How to Make a Men's Waistcoat

How to Make Darts in Shirts
How to Make a Satchel

How to Make a T-Shirt More Feminine

Different Kinds of Blouses

How to Make a Leather Skirt
How to Make a Jacket From a Sweatshirt

How to Dress a Woman With Slim Hips
How to Make Leeloo Suspenders

Letterman Jackets in the '50s

How Much Material is Needed for a Men's ...

How to Cut Up a Shirt for the Gym
How to Alter the Sleeves on Fur Coats

How to Sew a Western Shirt Pattern
How to Make Chinese Dresses
How to Make Fleece Gloves
How to Make Kilts

Brooch Vs. Pin
References
Writer Bio
Patricia Neill began writing professionally in 2000, spending most of her career as managing editor of “Blake: An Illustrated Quarterly.” Neill published political satire at LewRockwell.com and other libertarian websites. She also has an essay in “National Identification Systems: Essays in Opposition." Neill holds a Bachelor of Arts in English from Nazareth College of Rochester.
Photo Credits
Hemera Technologies/PhotoObjects.net/Getty Images