
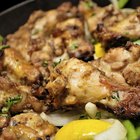
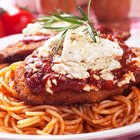
Thin, breaded chicken fillets, also called cutlets, escalope and schnitzel, can fit into practically any meal, whether you serve them over an arugula and tomato salad with a low-fat dressing or top them with cheese and marinara to make chicken Parmesan. When you purchase boneless, skinless chicken breasts from your grocer, the breasts have one thick and one thin end, which results in uneven cooking. A meat mallet comes in handy for pounding the meat to uniform thickness and breaking up muscle fibers. Chicken prepared this way is traditionally fried in oil, but can be baked for a lower-fat meal.
Preparation
Step 1
Place a thawed chicken breast between two pieces of plastic wrap or wax paper and set it on a cutting board. Beat the chicken breast with a meat mallet, particularly at the thick end, to flatten it to a uniform thickness between 1/4 and 1/3 inch. The breast becomes longer and wider as it flattens, but you can cut the breast into two smaller pieces, if desired. Flip the breast over with the smooth side down and cut along the natural groove in the center of the breast.
Step 2
Set up four shallow plates or bowls to create stations for breading the chicken. Add a thin layer of flour to the first station, including any dry seasoning you might wish to add, such as salt, pepper or garlic powder. Beat an egg, including the yolk, for the second station. Line the third dish with your choice of breadcrumbs, such as Japanese-style panko breadcrumbs, Italian seasoned breadcrumbs or plain breadcrumbs. Mix herbs and spices with the breadcrumbs, if desired. Leave the fourth plate or bowl empty so you have a place to put the breaded chicken before cooking.
Step 3
Dip both sides of the chicken breast into the flour to lightly coat it. Move the breast to the egg mixture to coat both sides and allow the excess to drip off the breast. Push both sides of the breast firmly into the breadcrumbs until well-coated. Hold the breast over the plate and shake it gently to remove the excess. Place the finished, breaded chicken breast on the fourth plate while you bread the remaining chicken breasts.
Pan Frying
Step 1
Add about 1/4 inch of oil to the bottom of a frying pan, using your choice of olive oil, vegetable oil, shortening or a similar fat. Heat the oil over medium heat; you can increase the heat if the chicken cooks too slowly, but the heat should not exceed medium-high or the breading will burn before the inside of the chicken is cooked thoroughly.
Step 2
Fry the fillets in the hot oil for about 3 to 4 minutes on each side. Do not overcrowd the chicken breasts in the pan because this can disturb the bread coating and make it difficult to flip. Use tongs or a spatula -- never a fork -- to check the underside of the meat as it cooks so you don't pierce the meat and lose the juices. Flip the fillets when you achieve a golden brown, crispy bread coating.
Step 3
Remove the chicken breasts from the pan when both sides are golden brown. For maximum food safety, the internal temperature of the breasts should reach 165 degrees Fahrenheit; you can use an instant-read thermometer to check the temperature when you think the chicken is done. Place the chicken on a clean plate lined with paper towels to absorb the excess oil from the breading; serve immediately.
Baking
Step 1
Preheat your oven to 375 to 425 degrees. Some cooks prefer higher temperatures because they cook the meat faster, while others prefer to cook slowly to ensure the center of the meat has time to cook thoroughly before the breading burns.
Step 2
Place the breaded chicken fillets on a lightly oild baking rack set inside a shallow baking pan, leaving space between each piece. The baking rack allows the hot air in the oven to circulate around the top and bottom of the chicken for even cooking, and also allows any grease to drip away from the meat. If you prefer not to use a rack, you can place the chicken directly on a lightly oiled baking pan.
Step 3
Bake the chicken fillets for 7 to 10 minutes on each side. A meat thermometer is especially important when baking chicken because cooking times vary greatly depending on the thickness of the meat and the temperature inside the oven. You can serve baked chicken immediately when finished because there's no grease to drain.
Related Articles

How to Cook a Butterflied and ...
How to Broil Chicken on the Bone

How to Cook Chicken Schnitzel

How to Cook Chicken in Olive Oil With ...
How to Cook Chicken Thighs
How to Cook Drumsticks With Bread ...

How to Cook Crispy Chicken Strips

How to Bake Boneless Chicken to Stay ...
How to Make Crock-pot Chicken

How to Re-Crisp a Cold Roast Chicken
How to Cook a Chicken in a Toaster Oven ...
How to Cook Boneless Skinless Chicken ...

How to Make the Coating Stay on Breaded ...
How to make chicken parmesan

How to Dice Boneless Chicken
The Best Way to Cook Breaded Chicken ...

Easy Way to Cook Chicken Breasts for ...
Quick and Easy Chicken Parmesan Recipe

How to Bake Chicken Breast Without Oil
Easy Fried Chicken Recipe
References
Writer Bio
A former cake decorator and competitive horticulturist, Amelia Allonsy is most at home in the kitchen or with her hands in the dirt. She received her Bachelor's degree from West Virginia University. Her work has been published in the San Francisco Chronicle and on other websites.
Photo Credits
Eising/Photodisc/Getty Images