
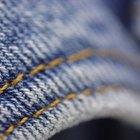
Deconstruction is the name of the denim game -- but time alone isn't what elevates this tattered trend from worn-out to well-worn. This is no dingy denim -- today's shabby-chic jeans come fresh from the rack, the distressed design simply an extra step in the manufacturing process. Get the worn-in look without the wear by distressing the bottoms of your too-pristine jeans to take them to the next style level.
Step 1
Launder your new jeans normally to prewash the denim. Prewashing will shrink the fibers, particularly lengthwise. Avoid laundering if you prefer the unwashed raw denim look.
Step 2
Have the hems altered to the desired length, if necessary.
Step 3
Examine the hems of the jeans and determine the wear pattern you want. Mark the wear spots, including holes, fuzzy spots and fringe spots, on the folded edge of each hem with a pencil. Concentrate on spots on the back, where natural wear is heaviest.
Step 4
Slide a wood block inside the hem of each leg to create a hard surface.
Step 5
Run a sanding block or piece of medium-grit sandpaper along the hem folds to weaken the denim at the marked spots. Rub the hem surface with horizontal strokes and then vertical strokes to damage the weave.
Step 6
Dip a toothbrush into diluted bleach or squeeze the liquid from a bleach pen onto it. Rub the toothbrush along the hems to make the distressed spots stand out. Launder the jeans immediately after bleaching to remove the bleach residue and prevent it from further distressing the hems.
Step 7
Examine the hem edges and select fringe areas or holes to accentuate. Coax broken threads into loosening around the edges of holes by nudging them away from the weave with a sewing needle. Loosen groups of threads to make a fringe.
Related Articles
How to Fade & Distress My Jeans

How to Fray a Jean Jacket

How to Restore Discolored Boots

How to Cut Feet Off Tights

How to Defuzz a New Fleece Jacket
How to Use 600 Grit Sandpaper to Remove ...

How to Fix Holes in Pantyhose

How to Fix Holes in Cotton Shirts

How to Get a Snag Out of Polyester ...

How to Sew Elbow Patches on a Knit ...

How to Stretch Out Cutoffs

How to Make a Muscle Shirt Out of a ...
How to Clean a Chamois Leather Jacket ...
How to Stop Satin from Fraying

How to Glue Rhinestones on Jeans

How to Distress Clothing and Baseball ...

How to Get a Worn Look on the Bottom of ...
How to Sandpaper Jeans

How to Alter the Length of a Leather ...

How to Get Cigarette Burns Out of Fleece
References
- Denim Mania; Carmen Webber and Carmia Marshall
- Jazzy Jeans; Mickey Baskett
- Birth and Beyond 360: How-to DIY Distressed Jeans
Tips
- For heavier sanding, use a high-speed multipurpose tool with a steel brush attachment. Scrape the attachment along the hem edges.
Warnings
- Work slowly and take a step back every now and then to survey your work. You can always add more distressing, but you cannot take it away once it's done.
Writer Bio
A writer with a Bachelor of Science in English and secondary education, but also an interest in all things beautiful, Melissa J. Bell has handed out beauty and fashion advice since she could talk -- and for the last six years, write for online publications like Daily Glow and SheBudgets.
Photo Credits
Thinkstock/Stockbyte/Getty Images