
Regular whipped cream doesn't hold up well when piped onto cakes unless a stabilizer is added to prevent the emulsion from reverting back to a liquid state. Ingredients you can add to stabilize whipped cream include powdered sugar, pudding mix and lemon juice, but gelatin and piping gel prove most effective for long-term stability. After stabilizing the whipped cream, you can pipe decorations such as shell borders and flowers on cakes without worrying about a gooey mess within minutes. You can also decorate the cake ahead of time and stick it in the fridge until you're ready to present it.
Step 1
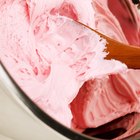
Divide the stabilized whipped cream into separate bowls and mix in gel or powdered food coloring to color the whipped cream. Liquid food coloring thins out the frosting, so gels and powders work best.
Step 2
Spread the whipped cream smooth across the top and along the sides of the cake with an icing spatula. While not required, you might wish to apply a thin coat of buttercream frosting to seal in any crumbs before frosting the cake with whipped cream.
Step 3
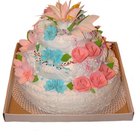
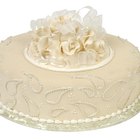
Insert a star decorating tip into a decorating bag and make large rosettes that mimic the look of buttercream flowers. Squeeze a star in the center and swirl the whipped cream around it twice to complete the rosette. The star tip opening creates ridges that resemble the multiple layers of an opening rose bud. While you can cover an entire cake with these rosettes, it also works well to apply a cluster of different sized rosettes in one corner of the cake.
Step 4
Pipe small drop flowers around larger rosettes as accent flowers. Use a decorating bag fitted with a flower tip. Simply hold the tip about 1/4 inch above the cake and squeeze the flower shapes onto the cake. Stop squeezing when you achieve the desired size and lift the tip straight up away from the flower.
Step 5
Insert a leaf tip in a decorating bag and fill the bag with green whipped cream frosting. Hold the tip at a 45-degree angle at the base of the flowers, squeeze the bag with medium pressure and drag it away from the flower to make leaves.
Step 6
Insert a petal decorating tip in a decorating bag and hold the bag at a 90-degree angle with the side of the cake, starting at the bottom. With the narrow end of the tip facing up, moving your hand up and down slightly while piping the whipped cream to create a horizontal ruffle. Turn the cake as needed to continue the ruffle. Repeat this in slightly overlapping layers to cover the sides of the cake with horizontal ruffles.
Step 7
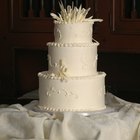
Apply a shell border around the top edge of the cake, using a shell decorating tip and your choice of color. Hold the bag at a 45-degree angle and, while applying medium pressure, move your wrist in a slight up-and-down motion to create small, ridged humps that resemble shells. This border can also be applied along the bottom of the cake.
Step 8
Write a message on the blank side of the cake with a decorating bag and a round decorating tip. Hold the bag at a 45-degree angle with the tip just above the cake surface. Squeeze the bag with medium pressure, and drag the stream of whipped cream frosting as you write the letters. Cursive letters require a continuous stream of frosting for the most part, but you'll need to stop squeezing the bag and pick up the tip to break off the stream at the end of a word and to add dots and crosses as needed. Manuscript letters require you to start and stop the flow more frequently than cursive.
Related Articles

How to Do Fancy Whipped Cream on Top of ...

How to Make Icing Tulips
How to Make Frosting Bubbles for a ...

How to Make Whipped Cream Filled ...
How to Make a Cake Look Like a Pineapple
How to Decorate Fake Cakes
How to Make Lilies With Frosting
How to Inject Icing Into a Cake Pop

How to Decorate Cake Using Heavy ...

How to Make a Fake Wedding Cake
How to Make a Surfboard Cake
How to Make a Monster Truck Birthday ...

Easy Birthday Cake Ideas for a ...

How to Make Your Eye Makeup Look Pretty ...

How to Decorate With Marshmallow Cream ...

Cupcake Decorating Ideas Without ...
How to Make Bakery-Style Whipped Icing

How to Make a Guitar Out of Cupcakes
What Is Dirty Icing in Cake Decorating?
How to Make a Wedding Cascade Bouquet
References
Tips
- This is the basic decorating method you'll find at a typical bakery, but you don't have to follow it exactly. Instead, feel free to pick and choose different techniques to suit your preference. For example, you might choose to skip leaves, ruffles, borders and a message and instead cover the entire cake in rosettes. Similarly, you can cover an entire cake in ruffles, including the sides and top of the cake. For a more simplistic design, try writing a message across the entire cake and accenting it only with a border along the top and bottom edges of the cake.
Warnings
- Keep the cake refrigerated until ready to serve to further help the whipped cream hold its shape.
Writer Bio
A former cake decorator and competitive horticulturist, Amelia Allonsy is most at home in the kitchen or with her hands in the dirt. She received her Bachelor's degree from West Virginia University. Her work has been published in the San Francisco Chronicle and on other websites.
Photo Credits
RAYES/Photodisc/Getty Images