
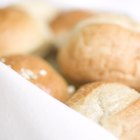
Feeding your family a healthy diet is important, but you also want meals to taste as delicious as they are nutritious. One way to do that is with fresh-baked breads and rolls. Baking your own dinner rolls requires laborious kneading, folding and shaping that few modern moms have time to do, but you can cut that time significantly. Let a heavy-duty stand mixer fitted with a dough hook do all the kneading while you get all the praise.
Working with Yeast
If you're making traditional dinner rolls, you'll use yeast in your dough. Unlike most ingredients in your kitchen, yeast is alive; these tiny organisms produce carbon dioxide as they eat sugar, and that gas gives your dinner rolls their fluffy texture. The yeast needs a small amount of sugar and the proper temperature to develop and multiply, so work with lukewarm water and incorporate at least 1 tsp. or so of sugar into your dinner roll dough. Yeast doughs require plenty of kneading to incorporate the yeast evenly and develop the proper dough texture, so a stand mixer is a big help when baking homemade breads.
Kneading
Classic recipes typically call for many minutes of heavy kneading to develop the long strands of gluten - wheat protein -- that give dough the smooth, elastic texture it must have to expand in the oven. Hand kneading is a workout for your forearms, but you can skip the exercise with your stand mixer's dough hook attachment. Some heavy-duty stand mixers can handle up to six minutes of kneading, which is plenty for soft dinner-roll doughs. You can keep your hands free and add ingredients straight to the bowl, letting the hook incorporate the yeast, sugar, salt, water and flour. Give the underside of the mixer's bowl a quick spritz of nonstick cooking spray to make it easy to remove for cleaning after kneading, as the heavy dough and the action of the hook can wedge the bowl into its setting quite firmly.
Shaping
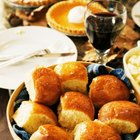
The simplest dinner rolls are just rounds of dough small enough to nestle in the palm of your hand. These will spread in the oven to form rolls that resemble small, puffy hamburger buns. If you want to get fancier with shapes, the three-lobed cloverleaf shape is a good choice. Cloverleaf rolls consist of three small spheres of dough tucked into a single muffin tin depression, individually oiled or buttered to keep from merging together in the oven . As they bake, they press against one another but pull apart easily for buttering. Braids, twists and fans make a dramatic impression on your family at the dinner table, but they'll love the taste of hot fresh bread no matter how you shape it.
Additions and Toppers
Plain dinner rolls kissed with butter suffice for purists, but you can get more creative with your dinner rolls if you like. Try topping them with a sprinkle of ground flaxseed before popping them in the oven to add a nutty flavor and extra fiber to your family's meal. Tiny black poppy seeds are as decorative as they are tasty. Mix sauteed onion pieces into the dough as it processes in your stand mixer; the finished product will have a mild onion flavor that suits kids who prefer subtler flavors to strong ones. Mix in a packet of seasoning mix or dip mix and a handful of chopped, fresh parsley for a savory treat. Brushing dinner rolls with a mixture of egg and water will turn them shiny as they brown, while a butter basting will keep the tops of your rolls tender.
Related Articles
How to Make Homemade Bread
Easy Cinnamon Roll Recipe
Can You Refrigerate Homemade Yeast ...
How Long to Knead Bread Dough by Hand?

How to Make Bread Tender
Easy Soft Pretzel Recipe
How to Make Thin Extra Crispy Pizza ...
How to Make Dough in a KitchenAid Mixer

Can I Make Monkey Bread the Night ...
How to Make Light Airy Italian Bread ...
Why Are My Biscuits Always Flat?

How to Make Elastic Pizza Dough So You ...
How to Make Easy Cinnamon Rolls in 20 ...
Secret to Making Soft Chewy Italian ...
How to Make a Shine Glaze on Bread

Can I Make Chapati Dough in Advance?
How to Make Homemade Traditional Polish ...
What to Do With Pizza Dough When You're ...
How to Make Breadsticks Out of Pizza ...
How to Make Yeast Rolls More Flavorful
References
Writer Bio
Lauren Whitney covers science, health, fitness, fashion, food and weight loss. She has been writing professionally since 2009 and teaches hatha yoga in a home studio. Whitney holds bachelor's degrees in English and biology from the University of New Orleans.
Photo Credits
Jupiterimages/Photos.com/Getty Images