Fraying buttonhole threads not only make a garment look untidy, but they also may lead to your buttons' popping open at the slightest provocation. You don't need a fancy sewing machine with a buttonhole feature to fix this problem. Follow these steps to do a simple dressmaker's buttonhole stitch.
With a seam ripper, carefully remove all the threads from the frayed buttonhole.
Choose thread that matches as closely as possible the buttonhole thread you just picked out.
Cut a piece of the thread about 18 inches (45 cm) long, pass one end through the eye of a needle, and tie the two loose ends into a knot to create a double length of thread.
Holding the fabric right-side up with the buttonhole horizontal, begin stitching at the inside bottom edge of the buttonhole (the side farthest from the edge of the garment). Starting from the reverse side of the fabric, pull your needle up through all layers of the fabric at the same distance below the slit as the previous stitching was (you should be able to follow the line where the old stitching used to be).
Push your needle back down through the buttonhole slit.
Pull the needle back up through all layers of the fabric, just to the right of the first stitch, but this time stop when the needle is still piercing the fabric and the tip of the needle protrudes from the fabric 1/2 inch (12 mm) or so.
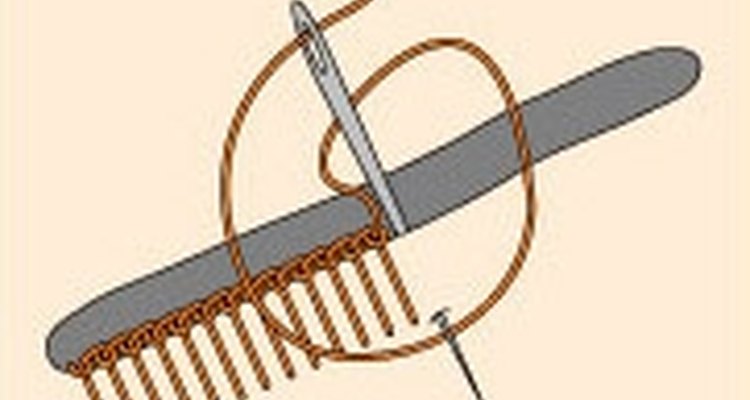
With your fingers, loop the thread clockwise around the needle, first under the eye end of the needle, then under the tip end (see A).
Pull the needle the rest of the way up through the fabric, creating a knot against the edge of the buttonhole slit.
Repeat steps 5 through 8, working along the edge of the buttonhole from left to right, keeping the stitches close together so that you can't see any fabric between the knots.

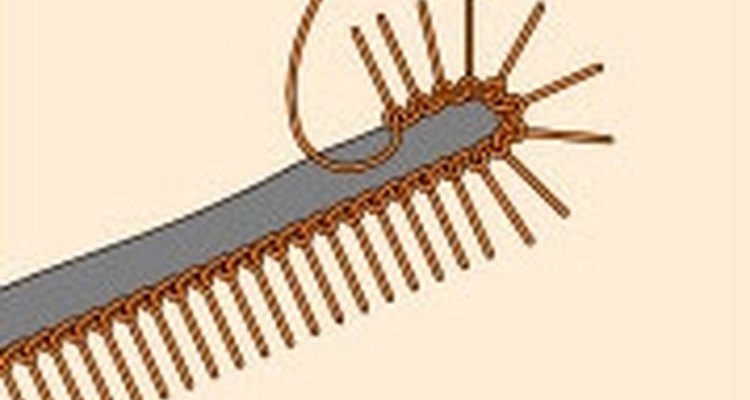
When you reach the outer edge of the buttonhole, continue creating the same knots around the end of the buttonhole (see B). Pull the knots tight and adjust them with your thumbnail so that they don't overlap, to keep the buttonhole from looking lumpy.
Continue creating these knots along the top and left edges of the buttonhole until you reach the point where you started.
Stitch through the first knot you made to finish encircling the buttonhole slit.
With the needle on the reverse side of the garment, make a finishing knot, pulling your needle through a few of the stitches you made at the beginning of the repair.
Snip off the extra thread, close to the knot you just made.
Related Articles

How to Replace a Missing Button

How to Fix a Hook on Pants

How to Fix a Rip in the Armpit of a ...

How to Hand Sew a Belt Loop on Pants

How to Hand Sew a Tear in Pants

How to Replace Shirt Buttons With Cuff ...

How to Get Rid of Perspiration Stains ...

How to Fix a Ripped Pocket

How to Repair Fur Coats

How to Rip Jeans at the Bottom

How to Keep the Elastic in a Waistband ...

How to Make a Satin Waistband Tutu

How to Make a T-Shirt More Feminine

How to Hem a Sequin Dress

How to Remove Studs & Rivets From Jeans

How to Tie Shoelaces With a Ladder ...

How to Stop Satin from Fraying

How to Fix a Snag In Cotton Pants

How to Hem a Shirt Collar

How to Put in a Separating Zipper
Writer Bio
This article was written by the CareerTrend team, copy edited and fact checked through a multi-point auditing system, in efforts to ensure our readers only receive the best information. To submit your questions or ideas, or to simply learn more about CareerTrend, contact us [here](http://careertrend.com/about-us).