
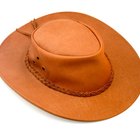
Whether you’re changing the color, brightening faded hues or adding the first splash of color to a blank hat, dyeing a cotton hat is a simple and rewarding introduction to modern craft dyeing techniques. Besides traditional liquid dye pots, modern colorants exist in versatile forms, and they can be applied in a variety of ways. Although synthetic chemical dyes can be hazardous, taking common-sense precautions makes coloring fabrics safe. If you’ve been “dyeing” to update your wardrobe accessories, a cotton hat works well to practice new techniques.
Cooking Up Color
Step 1
Don an apron and cover the floor and work area with a plastic dropcloth, keeping it away from stove burners.
Step 2
Prepare a dye bath following the manufacturer’s instructions for stove-top dyeing. Heat water in a clean, nonreactive pot (such as enamel, stove-top glass or stainless steel) large enough to accommodate the hat without it being folded or crumpled. Wearing dye-safe nitrile gloves and protective eyewear, dissolve powdered dye in 2 cups of hot water. Add the dissolved powder or bottled liquid dye to the water and stir slowly to mix it completely. Do not inhale fumes or dye powder.
Step 3
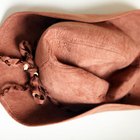
Wash the hat in hot water, rinsing it completely to remove all traces of detergent or soap. Leave the hat damp.
Step 4
Submerge the damp hat in the hot dye slowly to prevent splashing. Carefully swish the hat in the pot with a long-handled spoon, keeping it slowly moving through the simmering dye bath for at least 30 minutes.
Step 5
Check the intensity of the color periodically by briefly lifting part of the hat out of the dye with the spoon. Check different areas of the hat by lifting only small areas out of the dye; raising the entire hat can result in dropping the hat, splashing the hot dye and splattering dye onto surrounding surfaces. Keep in mind that the wet color is brighter and more intense than the dry color.
Step 6
Remove the hat from the dye pot with a spoon when the desired color is attained. Transfer the hat to a large, nonreactive glass or plastic bowl, being careful not to drip or splash the dye.
Step 7
Rinse the hat in warm running water, gradually making the water cooler. Rinse until the water runs completely clear. Wash the hat in warm soapy water and rinse it in cool water.
Step 8
Hang the hat to dry or reshape it by fitting it on an old wig stand or filling it with clean, dry rags. Touch up details with an iron after the hat is dry, if necessary.
Crayons and Brushes
Step 1
Add color details with dye sticks or paint-on dyes on damp or dry fabric. Apply dye sticks as crayons, or blend them with water and brush them on. Apply paint-on dyes with a foam brush or soft-bristle brush.
Step 2
Allow the hat and the design to dry. Dye sticks and paint-on dyes typically must be set with heat. To set the color, cover the design area with a press cloth and press with a hot iron in a non-sliding, up and down motion.
Step 3
Wash the hat in warm soapy water and rinse it in cool water to remove stray dye particles. Reshape it to dry, and touch up with an iron.
Related Articles

How to Dye a New Era Fitted Cap

How to Dye Hats

How to Clean a Dress Hat

How to Dye Sideburns

How to Redye a Shoe

How to Get Creases Out of a Canvas Hat

How to Restore the Shape of a Floppy Hat
How to Stretch Akubra Hats

How to Wash a Baseball Cap

How to Clean Sweaty Fitted Hats

How to Spray Dye a Synthetic Wig
How to Fix a Warped Felt Hat

How to Care for Berets

How to Dye a Swimsuit

How to Wash a Navy Sailor Hat
How to Dye Tulle

How to Properly Wash a Wig

How to Dye Faded Clothes

How to Get Rid of Yellow Age Spots on ...

How to Dye Faded Black Dress Pants
References
Resources
Tips
- A thin cotton hat should dry in two to three hours indoors; a hat with multiple layers or heavily stitched details may need to dry overnight. Speed up drying time by hanging the hat outdoors or in front of a fan. Keep the hat out of direct sunlight to prevent fading. If the hat was preshrunk, you can dry it in the clothes dryer.
- Combine different techniques: Dip dye a cotton hat and use dye sticks on a filmy scarf to create a decorative hatband.
- Cast iron, aluminum and copper are examples of materials that react with dyes, so avoid using those pots or utensils.
Warnings
- Pots and utensils used for dyeing should never be reused with food; reserve them for dyeing only.
- The chemicals in dyes are caustic and hazardous. Use only in well-ventilated areas wearing protective gloves, eyewear and clothing. Dispose of used dye liquids and rinse water responsibly.
- Dyes are specifically formulated for different fiber types and different purposes. Always follow the manufacturer’s instructions precisely.
Writer Bio
Fern Fischer's print and online work has appeared in publications such as Midwest Gardening, Dolls, Workbasket, Quilts for Today and Cooking Fresh. With a broader focus on organic gardening, health, rural lifestyle, home and family articles, she specializes in topics involving antique and modern quilting, sewing and needlework techniques.
Photo Credits
Hemera Technologies/PhotoObjects.net/Getty Images