
Excess facial oil can cause more problems than just a greasy-looking forehead. It can also combine with dirt and makeup to form a waxy buildup that blocks pores. If not removed, the waxy buildup oxidizes in the air and turns dark, creating the all too familiar blackhead. You may think the only thing that will clean all the gunk out is a vacuum. However, regular cleansing and exfoliation will usually do the trick.
Step 1
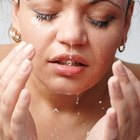
Squeeze a dime-size amount of exfoliating cleanser with salicylic acid onto a washcloth. Massage the cleanser over your face gently using the cloth. Concentrate on the areas of your face where you have clogged pores, such as the nose, chin and forehead. Rinse your face with cool water and pat it dry. Wash your face in the morning, at night and after every workout.
Step 2
Fill a sink with hot water and insert a herbal laxative into it, which, according to "Prevention Magazine," helps to open up the pores. Hold a towel over your head and lean over the hot water to steam your face. Continue steaming for three to five minutes.
Step 3
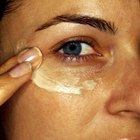
Apply a thin layer of a mattifying or oil-absorbing moisturizer over your skin every morning. Allow the moisturizer to dry thoroughly before applying makeup or sunscreen. These moisturizers help absorb excess oil so that it doesn’t settle into the pores.
Step 4
Spread a thin layer of acne gel containing salicylic acid over all blocked pores each night after cleansing. The acid exfoliates dead skin that is deep within the pores to unblock them.
Step 5
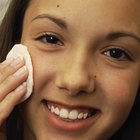
Apply an oil-absorbing clay mask over your face in a thin layer, making sure to avoid the eyes and mouth. Wait 10 to 15 minutes to allow the mask to dry completely to the touch. Rinse the mask off with warm water and pat the face dry. Apply the mask once per week to remove excess oil from your pores.
Related Articles
How to Repair Open Pores

How to Even Out Skin Tone Without Makeup

How to Get Rid of All the Tiny Embedded ...

How to Prevent Pock Holes From ...
How to Stop Facial Redness From Shaving

How to Maintain Good Skin After Accutane

Benefits of Shea Butter and Coconut Oil ...
How to Use a Toner on the Face
The Best Facial Moisturizer That Won't ...

How to Heal an Inflamed Bikini Area

Can the Neck Be Exfoliated?

How to Remove a Dilated Pore on the ...

How to Steam Your Face With Essential ...

How to Shrink Pores With Proactiv

Yogurt Face Mask for Acne

How to Get Rid of Light Colored Bags ...

Green Tea Remedy for Blackheads

What Is the Difference Between Facial ...

How to Use Pyrithione Zinc for Rosacea

Help With Chapped Red Cheeks
References
Tips
- To prevent your pores from clogging back up, only use makeup and skin-care products that are labeled oil-free.
- When possible, use gel-based products instead of creams, which can sometimes clog pores.
Warnings
- Do not use gritty exfoliating scrubs on your face, as they are too harsh for the gentle skin in this area.
Writer Bio
Kimberly Johnson is a freelance writer whose articles have appeared in various online publications including eHow, Suite101 and Examiner. She has a degree in journalism from the University of Georgia and began writing professionally in 2001.
Photo Credits
Medioimages/Photodisc/Photodisc/Getty Images